


8 Tips for Lightning-Fast Lightroom Editing

If you're tired of waiting around for your edits to process, these eight tips are here to rescue you.
1. Smart Previews: Your Editing Allies
When importing images, tick the box to "Build Smart Previews." For added efficiency, render one-to-one previews if time permits. This will particularly benefit your zoomed-in, detail-oriented edits within the Develop module.

2. Performance Preferences: Setting the Stage
Navigate to "Preferences" and access the "Performance" tab. Elevate your camera raw cache size to 10 gigabytes, if space allows. Deselect "Enable Hover Preview of Presets" and "Loop." Opt for "Use Smart Previews Instead of Originals for Image Editing" to enhance your editing experience.
3. Optimize Catalog: A Spring Cleaning Ritual
If your Lightroom catalog is brimming with thousands of photos, periodically hit "Optimize Catalog." This process helps declutter inefficiencies that accumulate over time, keeping your workspace nimble and responsive.
4. Library Module for Basic Corrections
Editing large batches of photos, like a wedding collection, can be a time-consuming affair. In the Library module, apply basic corrections such as exposure adjustments and white balance to groups of images. Highlight the batch, use the Quick Develop panel, and watch your edits spread seamlessly across the selected photos.
5. The Power of Synchronization
Highlight your edited image and shift-click to select a group of photos you want to sync. Enter the Develop module and initiate synchronization, copying the chosen settings to the entire batch. Local adjustments can be handled individually, streamlining your process.
6. Streamlined Display: Less is More
Collapse the Histogram and Navigator panels in the Develop module by default. Open them only when needed. This minimalist approach reduces the burden on Lightroom, ensuring smoother transitions between images.
7. Editing History Management
Embrace the non-destructive nature of Lightroom editing, but be mindful of the history panel. Clearing out unnecessary history steps helps maintain optimal performance. Click the 'X' next to history to streamline your edit.
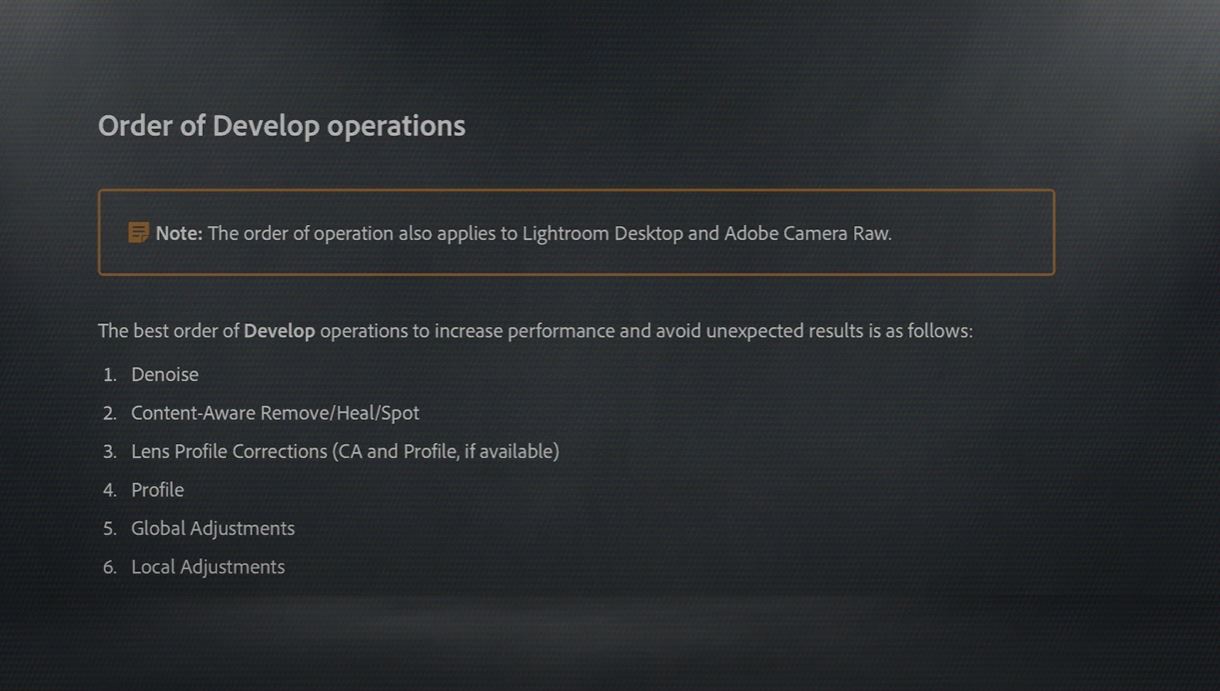
8. Sequence of Processing for Optimum Speed
Adobe advises a specific order for edits to maximize performance. Begin with denoise, then apply content-aware removal, heal spots, and lens profile corrections. Next, adjust global settings like white balance and exposure. Lastly, fine-tune local adjustments like masking.
Bonus: When to Apply Performance-Intensive Edits
Be strategic with noise reduction, sharpening, and lens corrections. Save these adjustments for the final stages of editing, ideally just before exporting. Applying them earlier can slow down your workflow unnecessarily.
Here are some additional tips that you may find helpful:
- Use presets to save time on repetitive edits.
- Organize your photos into folders and collections to make them easier to find.
- Use the Develop presets panel to apply pre-made edits to your photos.
- Export your photos in a format that is compatible with your needs.
By implementing these techniques, you can navigate Lightroom's intricacies with speed and finesse.
You may also like: How Mango Street Sold $47,000 in Stock Photos
About Mango Street:
 We are Daniel Inskeep and Rachel Gulotta. We're lifestyle + wedding photographers based in Los Angeles and Chicago. We’ve been working in social media management since 2012 and have found our niche as influencers through Instagram’s platform. Let's Get Connected: www.mangostreetlab.com | Get yourself some Mango Merch: bit.ly/mangomerch
Image and video via Mango Street


0 comments:
Post a Comment