


3 LIGHTING SETUPS for B&W Editorial Portraits
Creating impactful black and white portraits is an art form that goes beyond simply desaturating an image. The true power of monochrome lies in its ability to highlight form, texture, and emotion through the masterful control of light and shadow. This style is particularly effective for editorial and fine-art portraits, where a timeless, dramatic feel is desired. While the journey to mastering black and white photography is a long one, understanding how to build a lighting setup—from a single light to a complex multi-light array—is a crucial first step.
The following guide explores how to build black and white portraits from the ground up, starting with a simple, elegant single-light setup and progressively adding complexity to achieve different looks. You’ll learn how to sculpt your subject with light, create dimension, and even introduce a sense of dynamic motion into your images, all while focusing on the core principles that make monochrome so compelling.
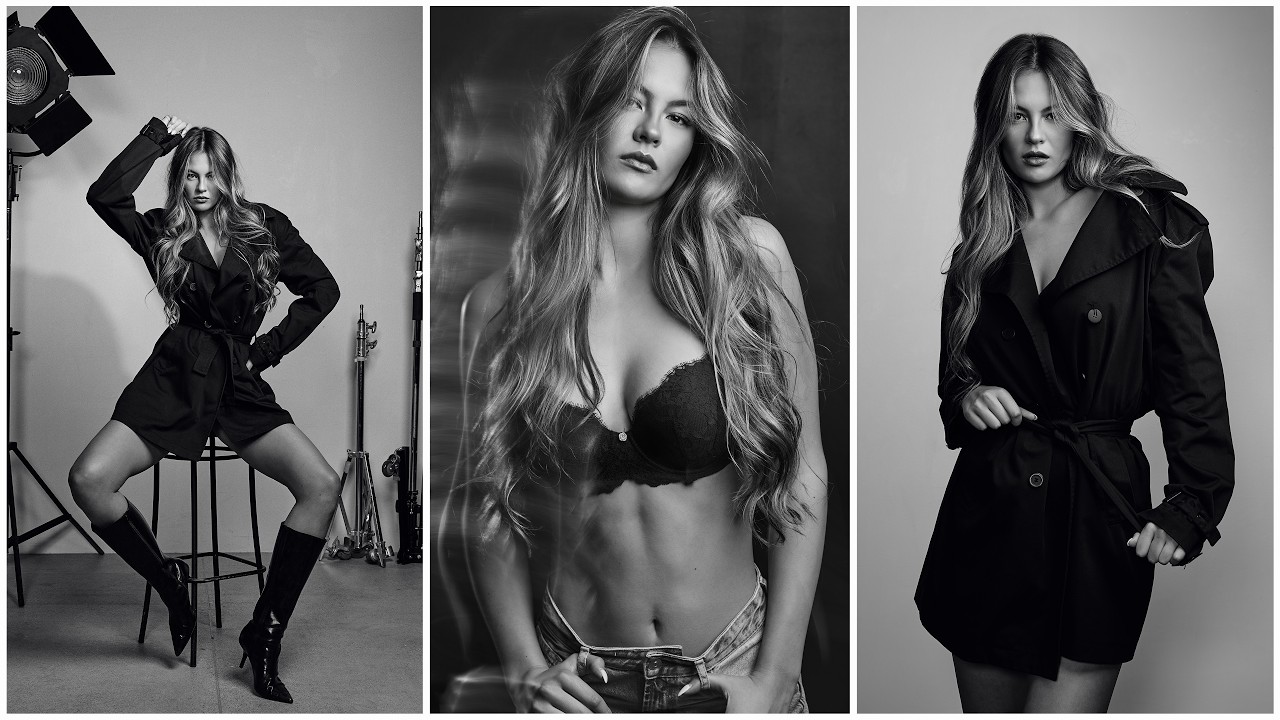
The Foundation: A Classic One-Light Setup
Starting with a single light source is the best way to understand the fundamentals of light. For a clean, classic black and white editorial look, a large, soft light source is your best friend. A large octabox, like the one mounted on an AD600 Pro, is a perfect choice. The goal here is to create soft, wrapping light that falls gently across your subject.

Position your subject about two to three feet away from a clean, white wall. This wall will act as a natural reflector, bouncing a subtle amount of light back onto the subject’s shadows and providing a clean, seamless background. Place your octabox at a 45-degree angle to the subject, slightly elevated and aimed down. This classic lighting pattern, often referred to as "Paramount" or "butterfly" lighting, accentuates cheekbones and jawlines while creating a subtle shadow under the nose. The result is a simple yet powerful portrait that draws the viewer’s attention directly to the subject’s expression and features. This is a foundational technique that every photographer should master.
Adding Depth with a Two-Light Setup
Once you're comfortable with a single light, you can introduce a second light to add more dimension and control. The primary function of this second light is to act as a "fill" light, softening the shadows created by your main light. This is particularly useful when you want to reveal more detail in your subject’s clothing or hair, preventing them from disappearing into the shadows.

Using a second AD600 Pro with a large umbrella or another softbox, position it on the opposite side of your main light, also at a 45-degree angle. The key is to set the power of this fill light lower than your main light. The goal isn’t to eliminate shadows, but to gently lift them, creating a less dramatic, but equally compelling, result.

This technique adds depth and separation between the subject and the background, giving your image a more layered feel. The interplay between the main and fill lights is what allows you to sculpt your subject’s form and control the mood of the portrait.
Introducing the Third Light: The Optical Snoot
For those who want to push their creativity and create a more artistic, high-contrast look, a third light can be a game-changer. This is where an optical snoot comes into play. An optical snoot is a specialized light modifier that allows you to project a small, focused beam of light onto a specific area. This creates a hard-light "spotlight" effect that can be used to dramatically highlight a feature, such as the subject's eye or a particular piece of jewelry.

To use this setup, keep your main and fill lights in their existing positions. Then, place the third light with the optical snoot behind or to the side of your subject. Aim the small, hard circle of light to strike a specific part of your subject's face. This technique adds a layer of complexity and visual interest that is difficult to achieve with soft light alone. The hard light from the snoot provides a distinct visual separation, creating a highlight that draws the viewer's eye and adds a sense of drama and intrigue to the portrait. This is an excellent way to experiment with light and shadow to create a more stylized, fine-art look.
Beyond Stills: Creating Motion with Mixed Lighting
While the previous setups are focused on static portraits, you can also use lighting to introduce a sense of motion and energy into your images. This is where the concept of mixed lighting comes in, combining a flash with a continuous light source.
The trick to this technique is to set a slow shutter speed, typically around 1/15th or 1/30th of a second. This slow shutter speed will allow you to capture motion blur. You will then use two lights: a flash for your main subject and a continuous light (like an LED panel) for the motion element. As you capture the image, your flash will fire, freezing your subject for a moment. At the same time, the continuous light will create a streaky, blurred effect as you move the camera during the exposure. This can be used to create an ethereal, dynamic look that tells a story beyond a simple moment in time. The frozen portion of the image, captured by the flash, provides a sharp anchor, while the continuous light and camera movement create a visually compelling blur.


0 comments:
Post a Comment