


Photoshop Beta's Relight: Change the Lighting of a Photo After the Shoot
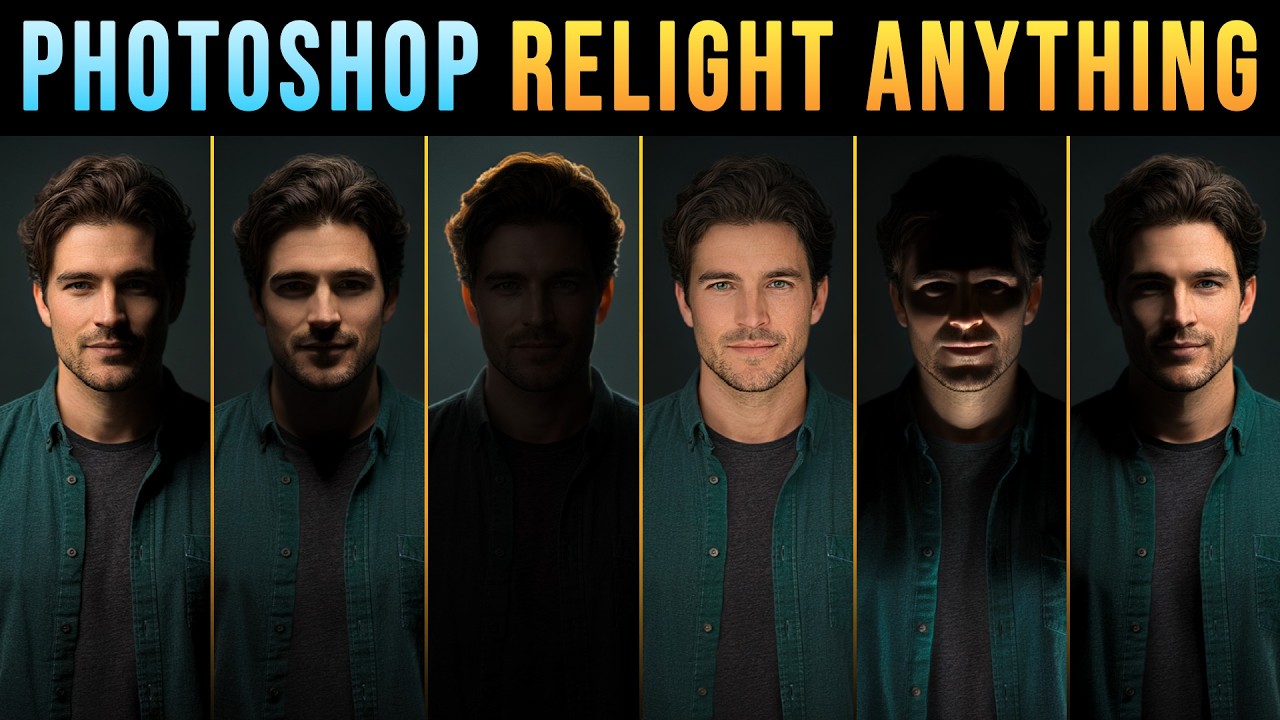
What if you could change the lighting of a photograph after the shoot is over? Photoshop Beta's new generative Relight feature gets surprisingly close. It removes the light already in the image and lets you build a new setup from scratch, so a flat window-lit portrait can become a moody, rim-lit one without a single dodge-and-burn pass.
Traditional retouching can only reshape the light a photo already contains. Dodge and burn, curves and selective color grading all redistribute existing illumination. Relight does something different: it recalculates highlights, contact shadows and depth around your subject according to lights you place yourself.
How Relight Works
Relight is a generative AI feature available in the desktop beta of Photoshop. You can add up to three interactive lights and adjust each one's position, intensity, color and diffusion. By setting the original lighting to zero, you replace the environment's shadows entirely with your own placements.
You can introduce point lights, choose between soft and hard shadow roll-off, and position a rim light anywhere in three-dimensional space.
The workflow is non-destructive. Relight creates its own layer, so your original pixels stay untouched, and you can reopen the lighting later with Layer > Edit Relight Layer. Because the feature also supports Actions and scripting, it can be built into a repeatable retouching routine.
Getting Started
- Update to the latest Photoshop Beta and make sure you have an active internet connection, since the processing happens in the cloud.
- With your image open, choose Layer > New Relight Layer.
- Click the circle light icon in the Contextual Task Bar or the Properties panel to adjust each light's color, position, intensity and diffusion.
- Preview your setup. While you work, the preview is shown at low resolution.
- Click Done to generate the final result at the full resolution of your image.
Light That Respects the Scene
One detail worth noting from the demonstration is how the neural engine handles ambient sources already present in the frame. A window in an interior shot, for example, keeps its realistic luminosity while the contours of the subject are recalculated around your new lights. The result feels less like a filter pasted on top and more like a different lighting decision made on set.
Limitations to Keep in Mind
This is still a beta, and it shows. Generative upscaling can slightly soften fine micro-textures on complex composites, and early users report that, like other AI editing tools, Relight can make unintended changes to a person's appearance. Check faces, skin texture and hair carefully before committing to a result. Each render also costs generative credits, so it pays to plan your lighting before you click Done.
The workaround is simple: stamp your background layers first and use layer masking to restrict the effect to the areas that need it. That combination preserves detail while still delivering a convincing cinematic relight.
Practical Tips for Generative Relighting
- Zero out the original light: Set the "Original Lighting" slider to 0% to completely replace the environmental shadows with your own light placements.
- Stamp composite layers first: Press Ctrl+Alt+Shift+E (Cmd+Option+Shift+E on Mac) to create a stamped visible layer before relighting a multi-layered composite.
- Protect fine detail: Invert the relight layer mask (Alt/Option + click Mask) and paint only over the subjects you want affected, keeping generative changes out of everything else.
- Plan before you render: Settle your light positions and diffusion in the preview, then click Done once to avoid wasting credits.
Key The Bottom Line
Relight connects studio lighting theory with post-production flexibility. If you already think in terms of key, fill and rim, the controls will feel familiar, and the ability to experiment with a setup after the shutter has fired is genuinely useful. It will not replace getting the light right in camera, but it is a strong tool for rescuing a flat frame or exploring alternative looks from a single file.
Video and images via Photoshop Training Channel




0 comments:
Post a Comment